So.... Its been a really long time since I've written a new blog. Not that I haven't had ideas stirring in my head and said to myself, "Self, you should totally blog about that!"
Anyways, I wanted to share the SWEETEST story about my son. After school the other day, Michael's teacher called me. She wanted to share with me what happened in class that day. During the morning, Michael raised his hand and shared with his teacher what happened to his sister Mariyah. She was sledding and hit a tree, so she fractured her elbow. They talked about how scared mom & dad must've been and how sad Mariyah probably was. Then, he asked his teacher if she would pray for Mariyah to get better. She said she was so honored that he would ask her to pray and that it was so nice of him to think of his sister. She told him of course she would! So later on in the day, his teacher was reading poems and stories to the kids and Michael raised his hand again. This time he asked, "Are we gonna pray for my sister now?" You see, when we go to church and someone asks for prayer, we pray for them right there. Sometimes, we wait and pray all together for that person depending on the nature of the prayer needed. Michael must have assumed she was going to have the class pray together. Sadly, she had to explain that she couldn't lead the class in prayer but that she herself will pray for Mariyah tonight. She also asked the other kids, if any of them were praying people, could they pray for Mariyah too. We really have been blessed with Michael's teacher this year. She is just awesome and I'm so ecstatic that she isn't afraid to say words like "God" and "prayer" in the middle of class. I really wish he could have her every year. She is just an awesome, very caring teacher and she's so sensitive to the needs of each and every kid in her class.
What an awesome kid I have! This is one of those moments where you realize that even after all the tears and time-outs, our kids are really great little people and they DO listen. We must be doing SOMETHING right. After I hung up with her, I gave my son the biggest hug and kiss and told him how thoughtful and kind it was for him to think of his big sister.
Thursday, January 17, 2013

Friday, October 12, 2012
Move Over Betty Crocker!
Sooo... I've become a bit obsessed with trying recipes on Pinterest. I always see all these yummy pictures of food and wonder if they taste as good as the picture makes them look. I have tried many, many recipes posted on Pinterest and I know personally, I'd love to know if someone had actually tried it and how it came out so i decided to do just that! I know....brilliant right!? You're welcome :) I'm new-ish to the world of cooking so I like to try new stuff out. The kids and hubby seem to enjoy my culinary skills and I haven't killed anyone or made them sick....yet!
For my first recipe: homemade sugar donuts.
This recipe has the simplest ingredients ever!
-1 can of Pillsbury Grands homestyle buttermilk
-Sugar
-vegetable oil or whatever you prefer
-medicine cup (trust me)
-tongs
-brown paper bag (or something to drain them on)
Start by flattening out the biscuits. Using the medicine cup, cut out the middle of each biscuit and save that tiny piece. Put sugar in a bowl big enough to fit your donuts. Warm up the oil and once it's ready, you can begin placing the donuts in the frying pan. Mine fit 4 at once. Don't crowd them. You can also sneak in the little middle parts around the donuts. Once they are golden brown on the bottom, use tongs to flip them to the other side.

When they are finished cooking on both sides, take them out and set them on the brown paper bag for just a few seconds to cool. They only need to be cool enough to touch. Place the donuts or donut middles in the bowl of sugar one at a time and flip to coat completely. You can also shake them in a lunch bag of sugar too, but we didn't have any so I improvised with the bowl idea. Enjoy immediately!
 If you happen to have any leftover, you can store them in an airtight container and they will stay soft. I hid/saved some just to see how they would be overnight, but if the kids had their way, it would still be a mystery... They were super duper delicious fresh out of the sugar!! I was concerned they would taste just like a regular biscuit, but we couldn't taste the difference. In my opinion, they tasted more like sugary biscuits THE NEXT DAY.
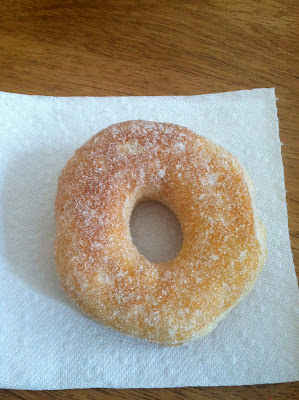
For my first recipe: homemade sugar donuts.
This recipe has the simplest ingredients ever!
-1 can of Pillsbury Grands homestyle buttermilk
-Sugar
-vegetable oil or whatever you prefer
-medicine cup (trust me)
-tongs
-brown paper bag (or something to drain them on)

When they are finished cooking on both sides, take them out and set them on the brown paper bag for just a few seconds to cool. They only need to be cool enough to touch. Place the donuts or donut middles in the bowl of sugar one at a time and flip to coat completely. You can also shake them in a lunch bag of sugar too, but we didn't have any so I improvised with the bowl idea. Enjoy immediately!


Friday, June 29, 2012
Cloud Dough
So we haven't done any really sweet crafts in a while and I saw a recipe for cloud dough. Never heard of it. Looked cool. Let's do it! So we did. We were able to make this for $3 total @ Dollar Tree. (flour, baby oil, container to store it) Of course if you have these items handy it could be even cheaper. The recipe is 8 cups of regular flour and 1 cup of baby oil. Mix it and voila!! You can get a 2 lb bag of flour and a 6.5 ounce bottle of baby oil at Dollar Tree. 2lbs = 8 cups. 6.5 ounces is less than a cup so we just took roughly a cup of the flour out. It took maybe 5 mins to mix it up real good. It vacuums up off of hardwood floors and I don't see why not out of a carpet but I haven't tested that. Also it isn't greasy from the baby oil FYI.
Thursday, March 22, 2012
Chalk Is Cheap
Im tired of buying chalk and it breaks within the first use. Even the thick pieces. Of course none of the kids want to use the broken ones. So there they sit, lonely, with no one to play with. No pavement or chalkboard wants them. Gone are the days where kids were just thankful to have something colorful to play with.


Rinse your bowl immediately after your done with hot water and make more using different colors. Let them sit overnight to dry out. Carefully pop them out of the mold and VOILA!! We found all of our supplies at our favorite craft store AC Moore. If you sign up for their emails, you get a 40% off coupon each week. Thats when we bought our plaster. I think the coupon brought it down to around $5. That 4.4 lb carton will last us through several batches. So chalk IS cheap.

I've decided to try out a recipe that I found on Pinterest for home made chalk. It was really easy and didn't take very long to whip up. The waiting part took overnight but I can deal with that. You need: plaster of paris, water, food coloring, rubber scraper, a glass mixing bowl and mold of your choice. We used soap making molds.
Mix the plaster of paris 2:1. I started with a cup of plaster and 1/2 cup of cold water. That gave us enough to fill two big squares on our mold tray. After your plaster is mixed, you can add 8 drops of food coloring if you want. We tried adding 8 more to see if the color would be darker but it didn't seem to change very much at all.


Mix well and pour into your mold tray. Gently tap the bottom of the mold against the table to release air bubbles.


Rinse your bowl immediately after your done with hot water and make more using different colors. Let them sit overnight to dry out. Carefully pop them out of the mold and VOILA!! We found all of our supplies at our favorite craft store AC Moore. If you sign up for their emails, you get a 40% off coupon each week. Thats when we bought our plaster. I think the coupon brought it down to around $5. That 4.4 lb carton will last us through several batches. So chalk IS cheap.
Happy Chalking!!

Tuesday, March 20, 2012
Home Made Bird Feeders
Last week the kids and I decided we wanted to make bird feeders out of pinecones. So i took the kids on a walk at Turning Point Park which is such a nice place to go. If you haven't been there, you should try it. We found a lot of pinecones and we even tied our little field trip into what we were learning about in science, conifer trees.


Another option we made afterwards was this last picture. You poke holes straight through the tube and insert sticks for the birds to perch on while they snack. Also poke two holes at the top for string to be able to hang it. Spread peanut butter on the same way and add bird seed. We took the sticks out before we started the PB and put them back in once we were done with the seed.
My next venture is making a home made suet feeder and home made suet. Even though I work at a pet store and can probably get one cheaper than i can make one, its more fun for the kids to make it themselves.


After we got our pinecone treasures home, we noticed a few that were not quite open yet. If you have a few like this all you need to do is turn your oven on 200-250 degrees and bake your pinecones on a cookie tray lined with wax paper. This will dry them out and allow them to open. It also gets rid of any bugs that may be inside them so thats why we just cooked all of ours. Watch them carefully, so they don't burn and once they are open you can remove them and let them cool. Ours took over an hour. I started the oven at 200 and quickly lost patience so I cranked it up to 250.


Besides pinecones, you will need peanut butter, string and birdseed. Tie your string on first. We tied some at the top and some at the bottom, both worked the same. Next, you lather up your cone with peanut butter and roll it in the birdseed. Ours seed was in a big bowl. I found that was easier for the kids because they could grab handfuls and pour them on the pinecones. After they are covered to your satisfaction, put them on a tray until you are ready to hang. Then find your favorite tree branch and tie the string around the branches. Now, just wait for your feathered friends to find their hand made treats!


 |
| It was 73 degrees on this 1st day of spring |

Another option we made afterwards was this last picture. You poke holes straight through the tube and insert sticks for the birds to perch on while they snack. Also poke two holes at the top for string to be able to hang it. Spread peanut butter on the same way and add bird seed. We took the sticks out before we started the PB and put them back in once we were done with the seed.
My next venture is making a home made suet feeder and home made suet. Even though I work at a pet store and can probably get one cheaper than i can make one, its more fun for the kids to make it themselves.
HAPPY SPRING
Thursday, March 15, 2012
Home Made Dryer Sheets
For a few months now, we've been using our home made dryer sheets. I've still got many more uses left out of them but thought I'd share the "recipe". It's really really really easy. Like you won't even need pictures. Plus I don't have any lol!
You need how ever many old washcloths or towels you can part with. I found about 5 washcloths and 2-3 small hand towels that had been stained or ripped. You will also need a small bucket like sand pail size or bowl. Lastly, your favorite FABRIC SOFTENER. I used downy lavendar scent.
Cut your washcloths in half and cut your towels into a similar size. Put them all into your bucket. Pour the fabric softner on top of them making sure they are all covered and soaking. You may need to save some strips to soak later if you don't have enough room in the bucket. Let them soak overnight. Grab a strip, wring it out and hang it to dry. Make sure you put newspaper under them to catch any drips if you need to protect your flooring. If you have dry ones left over then you can soak them now and repeat the process. Once they are dry (ours took overnight), you can stack them up and just toss one or two into your dryer load. You can reuse them several times. My cousin said about 30 times each which sounds about right but I haven't been keeping track. Just make sure you find them when you are folding and replace them on the bottom of your stack. You can resoak/reuse these until they fall apart. One small bottle of softener has lasted us about 3-4 months and we still have hundreds more uses left. Oh and if you wash one like I did once, no worries. Just resoak it. Mine actually still had some power left in it so I didn't need to do anything.
I've tried an even cheaper option. You can actually make your own fabric softener using conditioner vinegar and water. Then, use that in place of downy or whatever you use. I personally didn't like the home made softener but we used really cheap conditioner and it was too flowery for me. I'll stick to my lavendar downy!
Happy home-made dryer sheet making!!
You need how ever many old washcloths or towels you can part with. I found about 5 washcloths and 2-3 small hand towels that had been stained or ripped. You will also need a small bucket like sand pail size or bowl. Lastly, your favorite FABRIC SOFTENER. I used downy lavendar scent.
Cut your washcloths in half and cut your towels into a similar size. Put them all into your bucket. Pour the fabric softner on top of them making sure they are all covered and soaking. You may need to save some strips to soak later if you don't have enough room in the bucket. Let them soak overnight. Grab a strip, wring it out and hang it to dry. Make sure you put newspaper under them to catch any drips if you need to protect your flooring. If you have dry ones left over then you can soak them now and repeat the process. Once they are dry (ours took overnight), you can stack them up and just toss one or two into your dryer load. You can reuse them several times. My cousin said about 30 times each which sounds about right but I haven't been keeping track. Just make sure you find them when you are folding and replace them on the bottom of your stack. You can resoak/reuse these until they fall apart. One small bottle of softener has lasted us about 3-4 months and we still have hundreds more uses left. Oh and if you wash one like I did once, no worries. Just resoak it. Mine actually still had some power left in it so I didn't need to do anything.
I've tried an even cheaper option. You can actually make your own fabric softener using conditioner vinegar and water. Then, use that in place of downy or whatever you use. I personally didn't like the home made softener but we used really cheap conditioner and it was too flowery for me. I'll stick to my lavendar downy!
Happy home-made dryer sheet making!!
Wednesday, March 14, 2012
Cappuccino gone wrong
Pinterest strikes again! I need more energy, plain and simple. Everyone says coffee but it's repulsive to me. I even plug my nose in the coffee aisle lol! I found a recipe for home made cappuccino which I do love! Odd right? Tell me about it. So after work last night (about 9:30 pm) I went over to Pittsford Wegmans which is massive chaos at any other time of day. I got all the ingredients I needed and drove home to concoct my creation. After I had everything all together, I microwaved some water and put 3-4 heaping tablespoons of my mix into the water. I stirred and stirred. When I took my spoon out, it was full of coffee grounds. It suddenly occurred to me that while I knew I had to get instant coffee I had actually purchased coffee that you would brew. Yuck! So there's a whole batch of this stuff sitting on my counter bc I'm trying to figure out if I can strain out the coffee or put it through a coffee maker. Or maybe it's just a total loss. Lesson learned: never buy coffee alone unless you know what your doing. Man was that a dumb move. At least I could laugh last night. It was really quite funny! Well at least now I have coffee for when my mother in law comes over. She has a stash in my cupboard with all the supplies lol! I DO have a coffee maker though! It only brews 4 cups at a time. (It's for company what do you want from me?! LOL) Happy wacky Wednesday!
Update: I tried to put it thru the coffee maker. One, it was really watery. Two, I had to add a lot more creamer to make it drinkable. All in all, it wasn't bad per say. Just not to my tasting as it had too much coffee flavor in it. Looks like I'm going back to get INSTANT coffee...
Update: I tried to put it thru the coffee maker. One, it was really watery. Two, I had to add a lot more creamer to make it drinkable. All in all, it wasn't bad per say. Just not to my tasting as it had too much coffee flavor in it. Looks like I'm going back to get INSTANT coffee...
Subscribe to:
Posts (Atom)